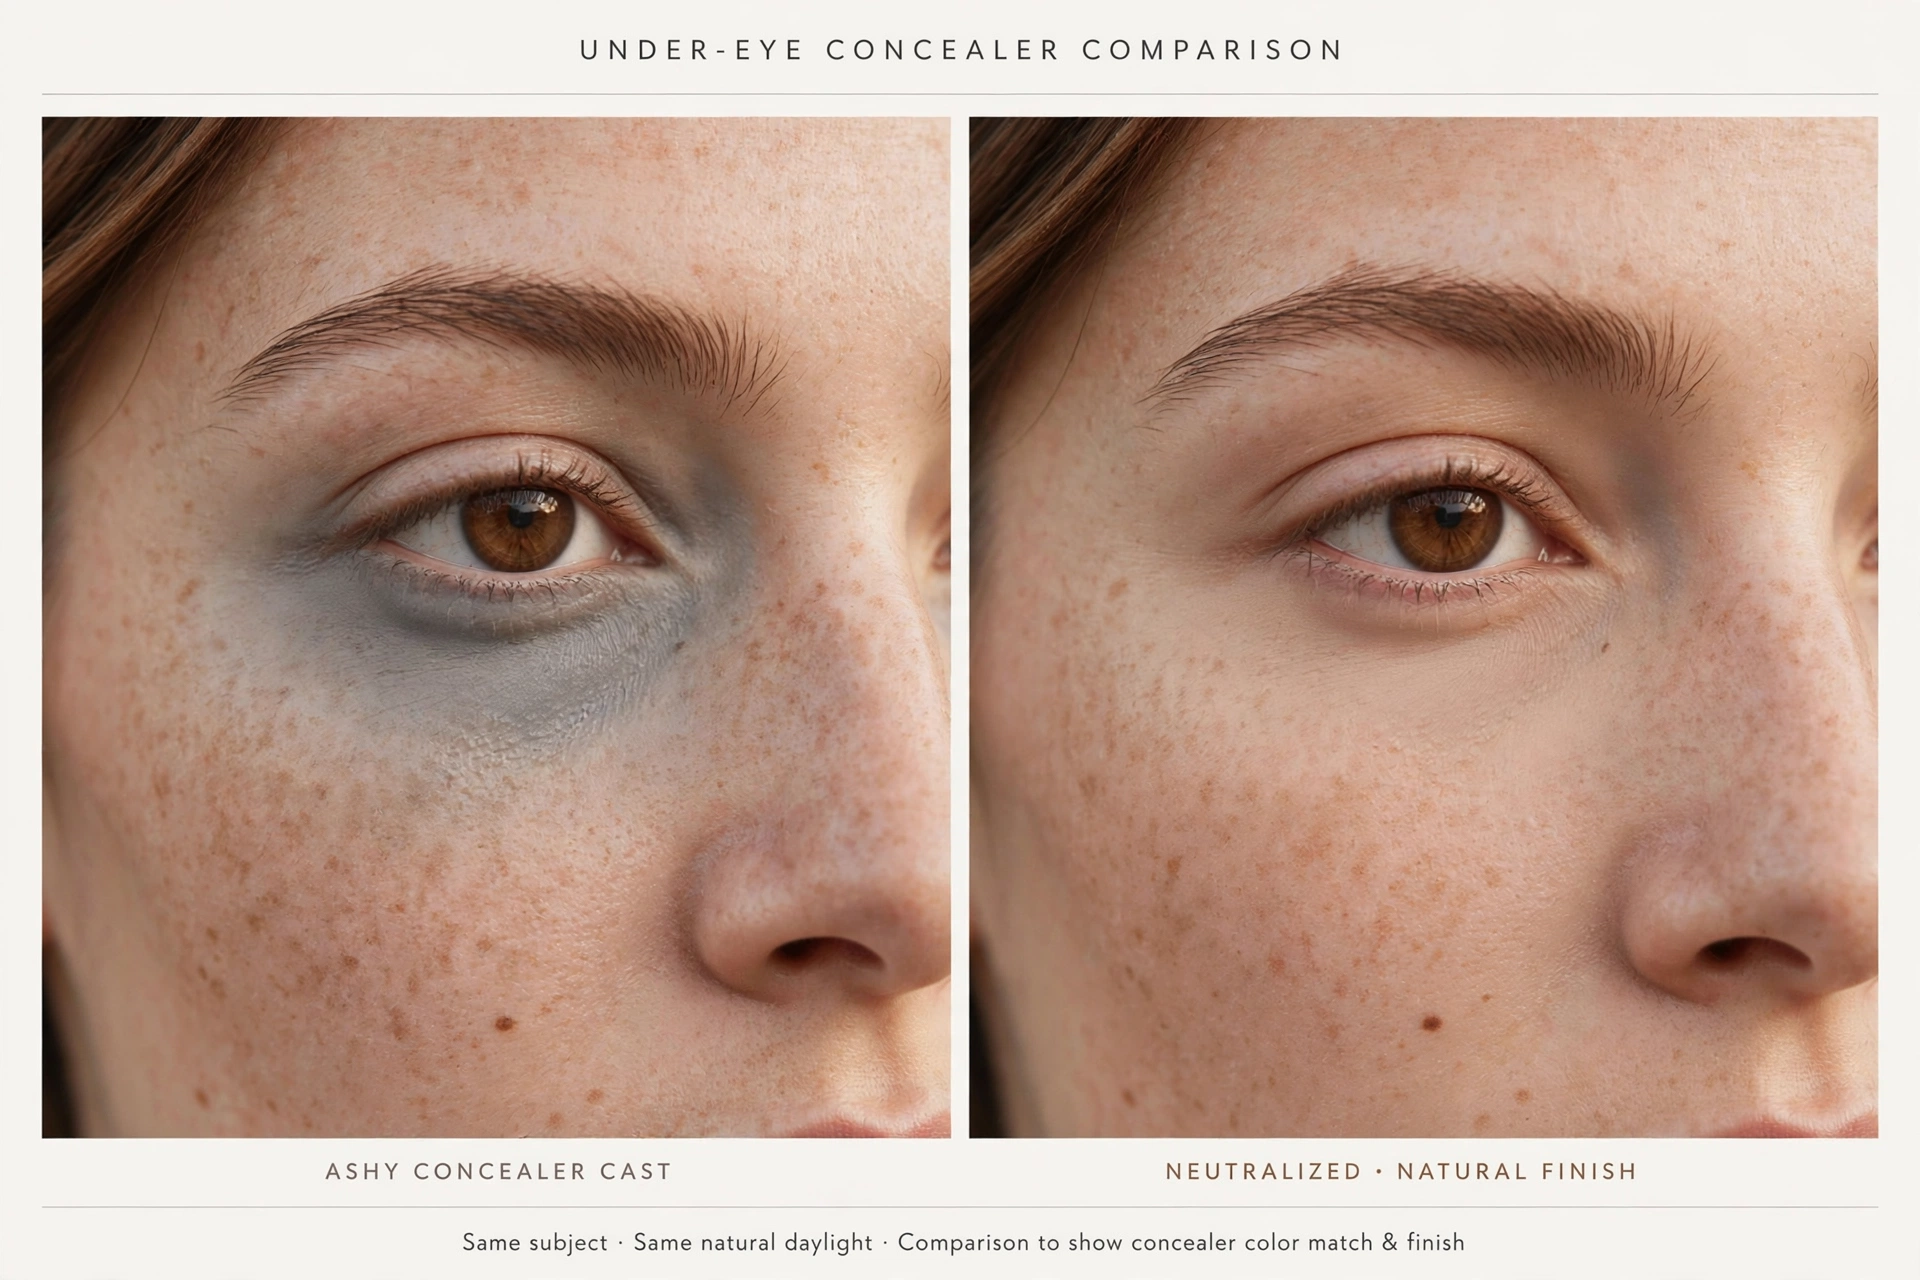
You blended carefully, stepped back — and instead of brightened under-eyes, you’re looking at gray. Not dark circles exactly. Not bright either. Just a flat, ashy gray where the concealer sits, as if the color went muted the moment it touched your skin.
Here’s what most advice skips: “gray concealer” isn’t one problem. Concealer that’s gray because it’s too light is failing for a different reason than concealer that’s gray because blue-purple darkness is mixing through it — and both are different from a concealer that used to work and now turns gray because the product itself has changed. Different causes, different checks, different fixes.
This guide works the way this publication always works: what you see → when and where it happens → what may be causing it → how to check → what to change. Timing and location are your fastest clues — but clues, not verdicts.
One honest statement up front: gray concealer often comes from two small factors at once (a slightly-too-light shade over fairly dark circles, say). The tests here separate them one variable at a time — they suggest; they don’t deliver a definitive diagnosis.
Scope note, once: This is a guide to concealer that covers but turns gray — under the eyes and over spots. Whole-face gray, lines-and-texture problems, and plain not-covering are different problems with their own guides; we’ll point you to them below. And this is cosmetic color guidance, not medical advice — a new or persistent change in your actual skin color, unrelated to makeup, is a clinician’s question, not a concealer’s.
The short answer
Gray concealer is a color-mixing outcome, and it usually comes from one of four causes:
- Too light. The shade is paler than your skin, so instead of coverage you get a light, desaturated veil — and over dark circles it reads distinctly gray.
- Wrong undertone. A cool or pink-leaning concealer over warm or olive skin can read gray even when the depth looks right in the tube.
- Un-neutralized darkness showing through. Blue-purple under-eye darkness mixing with beige pigment produces gray by simple color logic — it covers without ever canceling.
- The product itself changed. A concealer that once matched can start applying gray (or otherwise off) when its condition has degraded — judged by observable signs, not by the calendar.
The fastest way to sort your case: when did the gray appear, and where does it live? Two router questions, then five tests, then the fix.
- Gray from the moment you apply it → the cause is in the color design: depth, undertone, or what’s underneath.
- Gray that develops hours later — or a product that used to work and no longer does → check the product itself before you check your face.
- Gray only under the eyes (your foundation looks fine everywhere else) → usually neutralization or under-eye shade choice.
- Gray everywhere makeup sits, from the first stripe → that’s not this guide — see the look-alikes below.
Start Here: When and Where Is It Gray?
Answer two questions at the mirror, then jump to your branch.
When did the gray appear?
Immediately — during or just after application. The color was wrong before anything had time to change it. Investigate depth (Cause 1), undertone (Cause 2), or un-neutralized darkness (Cause 3).
Hours later — it looked fine at first. Don’t re-diagnose your shade at noon. A concealer that applies correctly and grays over the day points first at the product itself (Cause 4) — and only then at wear factors.
It never used to happen with this same product. This is the most under-read clue on this page. If the shade, your skin, and your routine haven’t changed but the result has, the variable that changed is the product. Go to Cause 4 before you buy anything.
Where does the gray live?
Under the eyes only. Your foundation looks right on your cheeks and jaw, but the under-eye triangles read gray. This is the classic presentation, and Causes 1–3 all compete here.
Under the eyes AND over spots or discoloration anywhere you conceal. If the same gray shows up over a blemish or a dark patch on your cheek, suspect the product (Cause 4) or a whole-routine shade problem — un-neutralized darkness alone doesn’t explain gray over an ordinary spot.
Your whole face. If the gray is everywhere from the first stripe, concealer isn’t the culprit — your foundation match is. That’s a different diagnosis entirely: our guide on why foundation looks ashy covers depth, undertone, opacity, powder, and lighting for the whole-face case.
The Four Reasons Concealer Turns Gray
Each cause below is a genuinely different mechanism. Most people who say “my concealer looks gray” are dealing with one; some are dealing with two at once.
Cause 1: Too Light — The Depth Problem
What you see: gray from the first application. The under-eye looks pale and flat rather than bright, sometimes with a visible contrast against your cheeks and neck.
What may be causing it. This is the most commonly named cause anywhere this question gets answered: a concealer two or three shades lighter than your skin can make the under-eye look more grey, not less. Skin has depth; a much paler pigment layer replaces it with a flatter, lighter veil. Over dark circles it’s worse: the pale layer and the darkness underneath average out into a desaturated gray that neither layer has on its own. “Brighter” and “lighter” are not the same thing.
How to check. Test 2 (skin-depth shade vs brightening shade, one eye each). If the skin-depth side reads natural and the brightening side reads gray, depth was the problem.
What to change. Start at (or very near) your skin’s depth for the coverage layer. If you want brightness, add it after the area already matches — a touch of a lighter shade at the inner corner or the darkest groove, not a pale coat across the whole under-eye.
What NOT to change yet. Your undertone assumptions — a too-light shade in the wrong undertone family is two problems wearing one coat; fix depth first. And don’t pile on more of the same light shade.
Cause 2: Wrong Undertone — The Color-Family Problem
What you see: the depth looks plausible — it isn’t obviously too light — but the result reads pinkish-gray, dull, or just “off,” even in good light (the grey-pink-orange merry-go-round: pink reads gray, so you try warmer, which reads too orange, so you try “neutral,” which reads gray again).
What may be causing it. Undertone is the second dimension of shade: not how light or dark, but what kind of color the pigment carries. A cool or pink-leaning concealer over skin with golden, warm, or olive tones sets up a color conflict the eye reads as desaturated — gray rather than pink, because the two colors fight instead of blending. Makeup guidance aimed at warm and olive skin tones names this failure directly: pink-toned concealer on warm or olive skin neutralizes brightness and creates a dull, grey shadow instead of coverage. The shade can be exactly your depth and still fail this way — it looks right in the tube and on a hand swatch.
How to check. Test 3 (undertone swap: same depth, cool-leaning shade on one side, warm-leaning on the other). If one side disappears into your skin and the other reads gray at the same depth, undertone was the variable — depth never was.
What to change. Shift undertone family at the same depth: pink-neutral → golden or warm-neutral, for example. Judge the swap in daylight, on your face — the skin beside the under-eye, not your wrist (hands run a different depth and undertone than faces).
What NOT to change yet. Don’t go darker to “warm it up.” Darker plus the wrong undertone is how gray becomes gray-orange — you’ve moved the depth axis to compensate for an undertone problem and now have both wrong.
Cause 3: Darkness Showing Through — The Neutralization Problem
What you see: the gray is concentrated exactly where your dark circles are darkest — often the inner corner and the hollow beneath it — while the surrounding skin looks fine. The more you layer, the grayer and heavier it gets.
What may be causing it. This is the color-wheel cause, and the one with the strongest practical consensus. Under-eye darkness commonly carries blue or purple tones. Blue-purple and beige don’t cancel — they mix, and the mixture reads gray. As one widely shared color-correcting explainer puts it, regular concealers without a color-correcting tint can leave skin looking ashy or gray precisely because they cover without neutralizing. Warm tones sit opposite blue and purple on the color wheel — which is why peach, salmon, apricot, and orange correctors exist: they cancel the cool darkness first, so a skin-matched concealer on top has a neutral base to cover.
What color is your darkness? It matters, because not all dark circles are blue. A peer-reviewed dermatology review (Sarkar and colleagues, Journal of Clinical and Aesthetic Dermatology, 2016) describes the typing dermatologists use, after Huang and colleagues: pigmented circles look brown; vascular circles look blue, pink, or purple — vessels showing through the thinnest skin on the face; structural circles are skin-colored shadow cast by anatomy (a tear trough or hollow), not pigment; and mixed circles combine these — the most common presentation in that clinical work. The makeup implications are direct:
- Blue/purple (vascular) darkness is the classic corrector case: warm peach-to-orange tones neutralize it.
- Brown (pigmented) darkness needs depth and warmth in the corrector matched to your skin — pale peach on deep brown pigment just makes a lighter gray.
- Structural shadow cannot be corrected with color at all: there’s no wrong color, there’s a groove casting shade. Piling corrector into a hollow does nothing the light won’t undo. The tell: lift your chin, or let light hit your face from the front — if the “darkness” largely disappears, you were looking at shadow, not pigment. Manage it with placement (concealer narrowly along the darkest groove, kept thin) and honest expectations: makeup softens that contrast; it can’t fill anatomy.
How to check. Test 1 (the half-face corrector test) is the decisive check: corrector plus skin-matched concealer on one eye, your usual concealer alone on the other. If the corrected side reads neutral and the uncorrected side reads gray, neutralization was the missing step.
What to change. Add a thin corrector before concealer, only where the darkness actually is — usually the inner corner and the trough, not the whole under-eye painted orange. Depth scales with skin: soft peach or salmon on lighter skin, apricot in the middle range, richer orange on deeper skin. Then a skin-depth concealer tapped over it (Cause 1’s fix), so the layers don’t blend back into the mixture you were avoiding. Done this way, you typically need less concealer overall — the corrector does the canceling.
What NOT to change yet. Don’t buy a darker concealer to “cover harder” — the gray is a mixing problem, not a coverage problem, and darker beige over blue still mixes gray, just deeper. And don’t spread corrector everywhere: past the dark area it has nothing to cancel.
Cause 4: The Product Itself Changed — The Condition Problem
What you see: gray that wasn’t there before. The same concealer, the same routine — but the result has shifted: grayish or off-color on application, uneven payoff, a product that applies differently than it did when it was newer. Forum reports of this presentation are vivid — a concealer that developed a green-grey tinge and an off smell, binned on the spot.
What may be causing it. We are deliberately narrow here, because this is where beauty content usually starts inventing chemistry. No expiration timeline and no oxidation mechanism will be asserted on this page — neither has consumer-grade evidence worth your money. What regulators and formulation experts do support is simpler and observable: cosmetics deteriorate. The FDA’s shelf-life guidance notes that expiration dates are only “rules of thumb,” and that a product can deteriorate well before any date if it has been improperly stored (heat and sunlight are named). Begoun’s oft-quoted rule is about signs, not dates: if a product seems unusually discolored, runny or lumpy, has separated, or has a strange odor, throw it away. A product whose pigment has visibly changed has no reason to deposit the color it used to — and gray is a plausible way for that to read.
How to check. Inspect the product before you inspect your face — Test 5 below. Has the color in the tube or on the wand changed from when it was new? Any off or unusual odor? Grainy, stiff, separated, or runny texture? Then the behavior check: does the same gray appear over a plain spot on your cheek, where no dark circle is involved? Gray everywhere this product goes, from a product showing any of those signs, is a condition verdict.
What to change. Retire the product. No application technique fixes a degraded formula. Replace like with like if it once worked — you may never have had a shade problem at all.
What NOT to change yet. Everything else. Don’t re-diagnose your undertone, buy a corrector, or overhaul your routine to accommodate a product that has changed. Swap the product first; if the gray survives a fresh tube, then the other three causes are back on the table.
Where powder fits (a conditional fifth variable)
If your concealer looks right before you set it and gray only after powder, the powder is a suspect layer of its own — a very light or white-based setting powder can veil the color beneath it. It isn’t a separate cause so much as a layer you can isolate in about a minute: set one eye and leave the other unset. If only the powdered side grays, the powder (shade, amount, or opacity) is the veil — use less of it, a truly translucent one, or one closer to your skin tone. If both sides are equally gray, powder is innocent and the gray was already there before setting. (One caution when you run this check: powder can also reveal dryness texture, which reads as “worse” without being grayer. Judge color and texture separately.)
Find Your Cause: Five One-Variable Tests
Knowing the four causes is useful. Knowing which one is yours is the diagnosis — and that’s what these tests are for. Each changes exactly one variable; everything else stays constant. These tests suggest; they don’t diagnose.
Test 1 — The Half-Face Corrector Test
Isolates: whether neutralization is the missing step (Cause 3).
Protocol: Eye A (test): a thin layer of peach/orange corrector tapped only onto the darkest area, then your skin-depth concealer over it. Eye B (control): the same concealer alone, applied exactly as you normally do. Check both eyes after application, and again after an hour.
Read: corrected side neutral, uncorrected side gray → neutralization was missing; Cause 3 confirmed as at least a contributor. Both sides gray → the problem is in the concealer itself (depth or undertone); move to Tests 2–3. Both sides fine → your usual application was never the problem; suspect timing (gray later → Cause 4) or lighting (Test 4).
Limit: corrector strength matters. A corrector far too pale or too orange for your skin muddies this test — if the corrected side looks orange-gray, its depth was wrong, which is itself information.
Test 2 — The Shade-Swap Test
Isolates: whether depth is the problem (Cause 1).
Protocol: Eye A: your usual (brightening) under-eye shade. Eye B: a shade at your skin’s depth — your face concealer or foundation-depth shade. Keep the corrector situation identical on both sides. Check after application, in daylight.
Read: skin-depth side natural, brightening side gray → depth was the driver; your brightening shade works only after a matched layer. Both gray → depth alone isn’t it; undertone (Test 3) or neutralization (Test 1) is still in play.
Limit: this test compares the shades you own. If both are too light, both gray — the right shade disappears; it doesn’t win by comparison.
Test 3 — The Undertone-Swap Test
Isolates: whether undertone is the problem (Cause 2).
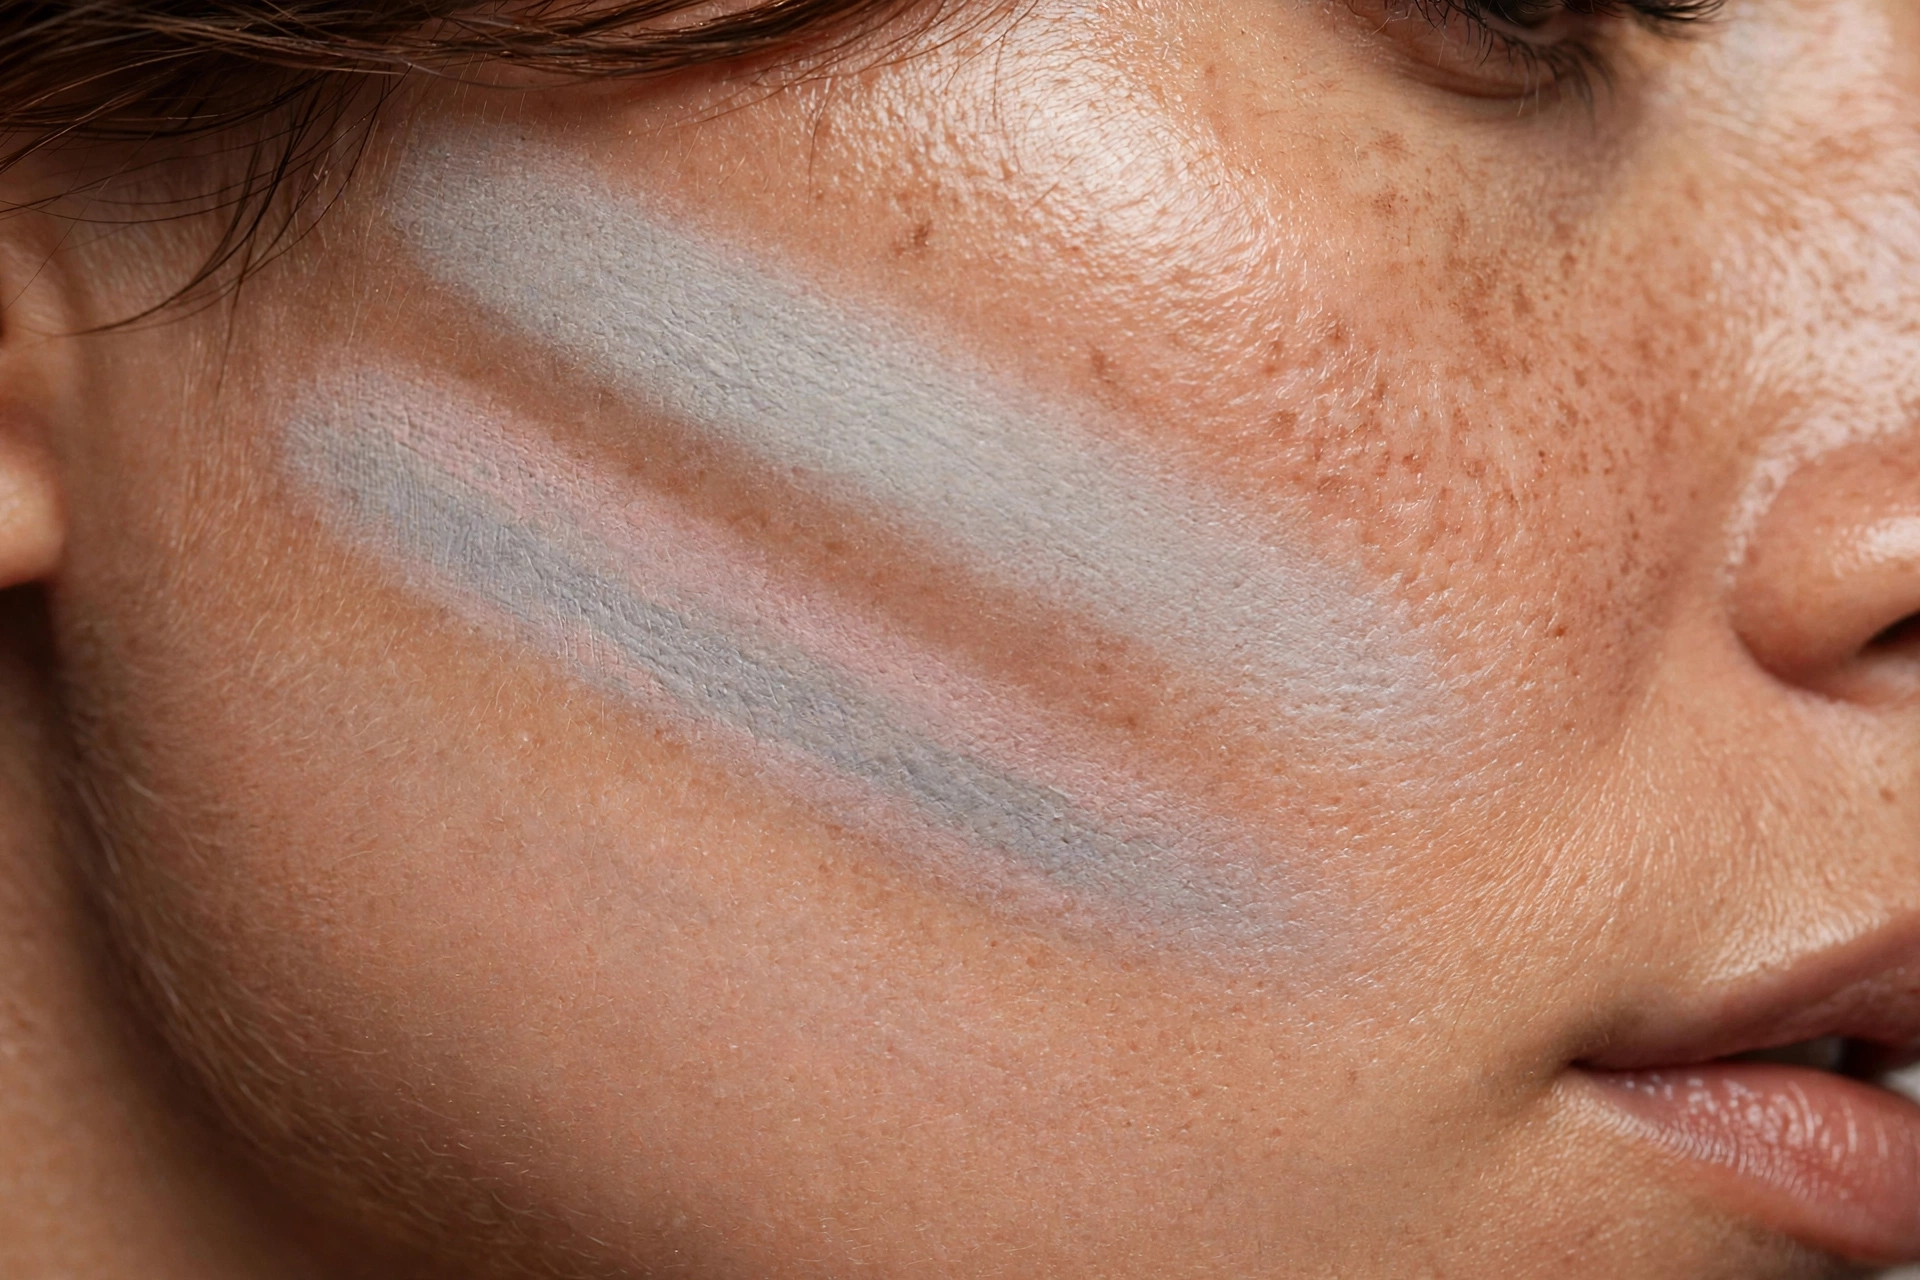
Protocol: pick two shades as close in depth as you can — one cool/pink-leaning, one warm/golden-leaning. One under each eye (or as stripes on the upper cheek beside the under-eye, where the color reads clearly). Same everything else. Daylight check.
Read: one side merges into your skin while the other reads gray at the same depth → undertone was the variable. Your fix is a family change, not a depth change. Both read gray → undertone isn’t the (only) axis; you’re likely missing neutralization (Test 1) or both shades share another flaw.
Limit: undertone labels on packaging are marketing, not measurement. Judge what the pigment does on your skin — “neutral” on the tube can be pink-neutral on your face.
Test 4 — The Daylight Check
Isolates: whether lighting is revealing (or inventing) the problem.
Protocol: apply as usual indoors, then check the same application in indirect natural daylight — facing a window, or outdoors in shade. Not direct sun, which exaggerates everything, and not a dim warm bathroom, which forgives everything.
Read: gray in daylight but fine indoors → your bathroom light was hiding a Cause 1–3 mismatch; daylight is the truer verdict, and the other tests should be read there. Gray only under one artificial light (office fluorescents are famous for this) and fine in daylight → investigate the light before the product. White or ghostly only in flash photos, fine in person → that’s flashback, a camera-and-light response covered in its own guide on this site — not gray concealer at all.
Limit: this test tells you where the gray lives, not why. It calibrates the other five tests rather than replacing them.
Test 5 — The Product-Condition Check
Isolates: whether the product itself has changed (Cause 4).
Protocol: no face application needed at first. Inspect: smell the product (any off, sharp, or unusual odor?), look at the wand and tube contents (has the color shifted since it was new? is there visible separation — liquid pooling apart from pigment?), feel the texture (grainy, stiff, lumpy, or runnier than you remember?). Then apply a small amount over an ordinary spot on your cheek, with no dark circle beneath it.
Read: any visible sign — odor, color change, separation, texture change — plus gray where this product sits, including over the plain spot → the product is the cause; retire it. No signs at all and gray only over the dark circles → the product is probably fine, and Causes 1–3 are back in charge.
Limit: memory is the comparison baseline (“different from when it was new”), and memory is imperfect. That’s acceptable here: you’re deciding whether a changed-looking product deserves suspicion before you re-diagnose your own face.
What to Change, Per Diagnosis
Once the tests point somewhere, change only what the diagnosis points to. Each row includes what not to do, because the standard reflexes for gray concealer — darker, more, another layer — are exactly how one problem becomes two.
| What you see | Likely cause | What to test | What to change | What NOT to do |
|---|---|---|---|---|
| Pale, flat gray from the first application; face–neck contrast; worse in daylight | Too light (Cause 1) | Test 2 — skin-depth vs brightening shade, one eye each | Coverage layer at (or near) skin depth; brighten afterward, narrowly placed | Don’t add more of the same pale shade to compensate |
| Depth looks right but reads pinkish-gray or dull; grey-pink-orange merry-go-round | Wrong undertone (Cause 2) | Test 3 — cool vs warm at the same depth | Undertone family at the same depth (e.g., pink-neutral → golden) | Don’t go darker to “warm it up” — darker + wrong undertone = gray-orange |
| Gray concentrated exactly over the darkest part of the circle; layering makes it worse | Un-neutralized darkness (Cause 3) | Test 1 — half-face corrector test | Thin peach/orange corrector (depth-matched) only on the darkness, then skin-depth concealer tapped over | Don’t buy a darker concealer to “cover harder” |
| Darkness unchanged by corrector; changes when you lift your chin or move the light | Structural shadow (Cause 3 caveat) | Light/chin check (Test 4 setting) | Narrow, thin placement along the groove — makeup softens, can’t fill | Don’t pile on corrector or coverage; the “color” is shadow, not pigment |
| Gray appeared recently with a product that used to work; may gray over plain spots too | Product condition (Cause 4) | Test 5 — smell, tube color, texture, separation + plain-spot check | Retire the product; replace like-for-like if it once worked | Don’t re-diagnose your skin around a changed product; don’t keep it “for spots only” |
| Concealer fine when applied, gray only after setting | Powder veil (conditional) | Powder check — one eye set, one unset (see the powder note under the Causes) | Less powder, truly translucent, or closer to your skin tone | Don’t switch concealers — it was fine until the powder |
| Fine at home, gray at work (or vice versa); fine in person, white in flash photos | Lighting (context) | Test 4 — daylight check | Where you judge your match, not the match itself | Don’t rebuy a routine based on one bad light or a flash photo |
If your result sits between rows — depth a little off and darkness un-neutralized — fix the bigger one first, retest, then move.

Gray, Creased, Ashy, or Just Not Covering? The Look-Alikes
Four problems get called “gray concealer.” They don’t share fixes.
Gray (this page). A color failure: the product sits smoothly, covers, and still reads gray. Causes 1–4 above. Stay here.
Creasing. A texture-in-a-fold failure: product gathers into under-eye lines, cakes in the fold, breaks apart over the day. The color may be perfect while the film misbehaves. That diagnosis — amount, prep, powder interaction, film flexibility — lives in our guide on why concealer creases under eyes. Boundary rule: gray cast with a smooth surface = this article. Pigment pooled in lines = that one.
Whole-face ashy. If the gray starts at the first stripe of foundation and covers cheeks, forehead, and jaw — with or without concealer — the concealer is an innocent bystander. That five-axis diagnosis (depth, undertone, opacity, powder, lighting, face-wide) is our guide on why foundation looks ashy. Boundary rule, mirrored from that page: gray from the first stripe, everywhere = foundation. Gray only where concealer sits, while the base looks right = here.
Just not covering. Your concealer goes on, stays the right color, and the darkness or spot simply shows through at strength — no gray cast at all. That’s a coverage problem (opacity, placement, expectations), not a color-mixing problem, and it’s a different diagnosis — planned as its own guide. Nothing on this page will fix it; this page treats concealer that covers but turns gray. Knowing precisely which problem isn’t yours is its own kind of progress.
One more honest neighbor: dry, flaky texture under the concealer. If the surface looks sandy, rough, or flaky rather than gray — pigment catching on dry texture — the failure is skin preparation, not color. Hydrated, settled prep (with time to absorb, not sit wet) is the fix direction; color tests will only confuse it. Judge color on a smooth day; judge texture on its own terms.
FAQ
Why does my concealer look gray under my eyes but fine everywhere else?
Because the under-eye is where the color fight happens. Dark circles add blue, purple, or brown underneath, and pale or cool concealer mixing with that darkness averages out to gray (Causes 1–3). If the same concealer also grays over a plain cheek spot, suspect undertone or the product’s condition (Cause 4).
What color corrector stops under-eye concealer from looking gray?
A warm one, matched in depth to both your skin and your darkness: peach or salmon for blue-purple circles on lighter skin, apricot through the middle range, richer orange on deeper skin — brown (pigmented) circles generally need that warmth at a depth close to the pigment itself. The corrector’s job is to make the area less dark, not to make it orange; if you can still see it afterward, it was too strong, too widespread, or the wrong depth. Thin layer, darkest area only, skin-depth concealer tapped over it.
Why does my concealer turn gray after a few hours?
Check the product first. A concealer that applies right and grays later — especially one that used to behave — earns a Test 5 inspection (odor, tube color, texture, separation) before any shade conclusion. One honest alternative: what accumulates in under-eye folds over hours is creasing, not gray — gathered pigment lines can read as dirty gray at a distance. If the late-day problem is lines, not cast, that’s the creasing guide’s territory.
Can old concealer make my under-eyes look gray?
It can apply off-color or unevenly once its condition has changed — judge by signs, not the calendar. Off or unusual odor, a visible color shift in the tube, separation, or a texture that’s turned grainy, stiff, or runny are the accepted cues (the FDA treats dates as rules of thumb). A product showing those signs near your eyes gets retired on suspicion — no technique fixes it.
Should under-eye concealer be lighter than my foundation?
For the coverage layer, usually not — start at or near your skin’s depth, because that layer’s job is to match, and going two-plus shades lighter is the single most-cited route to gray. A lighter shade has a legitimate second job: a small amount added afterward, narrowly placed (inner corner, darkest groove), after the area already matches.
Sources
Evidence tiers are labeled deliberately.
- Sarkar R, et al. “Periorbital Hyperpigmentation: A Comprehensive Review.” Journal of Clinical and Aesthetic Dermatology 9(1):49–55 (2016). Peer-reviewed review — source for Cause 3’s dark-circle typing (after Huang et al.): pigmented (brown), vascular (blue/pink/purple), structural (skin-colored shadow from anatomy), and mixed (the most common presentation in that clinical work). This guide borrows the typing only; it does not diagnose any reader’s circles or recommend treatment. jcadonline.com (Peer-reviewed.)
- Refinery29, “Color Correcting — How To Cover Dark Circles, Blemishes.” Color-wheel basis of Cause 3: blue/purple under-eye tones sit opposite orange/pink hues; “regular concealers without a color-correcting tint can leave skin looking ashy or gray.” refinery29.com (Established color theory, editorial.)
- NDTV Shopping, “Should You Apply Colour Corrector Before Concealer?” Professional-practice corrector workflow in Cause 3: corrector before concealer (neutralize, then match), thin amounts on the darkest areas only, skin-matched concealer over it. ndtvshopping.com (Beauty editorial / professional practice.)
- Calendar-Australia FAQ, “Why does my concealer under my eyes look so weird?” Aggregated professional Q&A used for Cause 1’s commonly-cited magnitude (“a concealer that is two or three shades lighter… might cause your under-eye area to look more grey”) and for corrector-depth scaling (peach fair-to-light, bisque light-to-medium, orange deep). calendar-australia.com (Expert guidance, aggregated FAQ.)
- “Why Concealers Turn Grey on Indian Skin — And How to Fix It Forever” (Medium, Dec 2025). Expert-guidance piece used for Cause 2: “A pink-toned concealer on warm or olive skin neutralizes brightness and creates a dull, grey shadow instead of coverage” — and corroborating Cause 1. Its “base oxidation” mechanism claim was not adopted (see Limitations). medium.com (Expert guidance, single-author editorial.)
- U.S. FDA, “Cosmetics Safety Q&A: Shelf Life” (fda.gov content), corroborated by WebMD, “Cosmetics: Do Makeup Products Have an Expiration?” Regulatory basis for judging condition by signs and storage rather than dates: dates are “rules of thumb”; improperly stored cosmetics “may deteriorate substantially before the expiration date”; eye-area cosmetics carry the most limited shelf life. WebMD likewise notes products break down faster with sunlight, heat, air, and moisture — “oil and water in some products may separate.” (Regulatory guidance + health editorial.)
- Paula Begoun, quoted in The Street, “Old Beauty Products: Keep or Toss?” Formulation-expert basis for the signs list in Cause 4 and Test 5: “if a product seems unusually discolored, runny or lumpy, has separated, has a strange odor, or feels different on the skin, then it should absolutely be thrown away.” thestreet.com (Expert guidance, quoted.)
- Lipstick Alley forum threads (user reports). Practical-inference tier, used only to show Cause 4’s presentation exists in the wild: a concealer that “suddenly has a weird green/grey tinge” with a changed smell; under-eyes that “look grey a couple hours after using concealer.” Anecdotes cited as experience — not evidence of mechanism. (User-reported experience.)
The limitation, stated plainly. There is no peer-reviewed study of “why does my concealer look gray” as a consumer phenomenon, and this guide doesn’t pretend otherwise. What exists: dermatology typing of the darkness underneath (Source 1), established color theory (Source 2), professional corrector/shade practice (Sources 3–5), and regulatory/expert guidance on product deterioration (Sources 6–7). Two claims you will find elsewhere were deliberately not used: any universal expiration timeline (“replace after X months”) and any oxidation-chemistry explanation for gray — neither survives this site’s sourcing standard. Every test above is a practical isolation method that produces an observation about your own face; honestly labeled, that is what it’s for.
What to Read Next
If your problem sorted into a neighboring guide above, you’re already pointed at it: why foundation looks ashy for the whole-face gray case, and why concealer creases under eyes for the texture-in-folds case. Planned next in this branch: the coverage-failure diagnosis.